To learn more about the types of intercooler setups found on these cars,
see the Turbocharger Concepts page.
I recommend that you read that page so that you know some of the terminology
that is used in the remainder of this page.
Then you need to decide how you are going to mount the intercooler. Depending on the vehicle, it is usually necessary to mount the intercooler somewhat low, but sometimes it can be mounted higher. You will have to turn it sideways, of course. If it can be mounted directly behind the front grill, that may be best, depending on how large the grill is. An AA-body (Dodge Spirit) has a large grill while a G-body (Dodge Daytona) has a very small or no grill. When it must be mounted lower (behind the bumper), it is usually best to mount it at a downward-facing angle to pick up the high pressure are coming around the bottom of the front bumper/air dam. A 15 to 30 degree angle is about right. You will also have to fashion some mounting brackets for the intercooler when mounting it behind the facia.
The most difficult part of this modification is routing the air hoses between the turbo, intercooler, and throttle body. If you don't have A/C and keep the stock Turbo II radiator, you can route them right through the hole where the intercooler was. Otherwise, you will either have to route them under the front crossmember, or cut holes in the front underbody panel. Use 2 1/4" exhaust pipe and 2 1/4" I.D. truck radiator hose. Be sure to have your routing all planned out so that you know what types of bends you need. You can buy smooth-bent exhaust pipe at various angles and connect them with short pieces of radiator hose, or you can try to find a pre-molded truck radiator hose that already has the angles you want and cut it up. Call up some local truck parts stores and see if they have anything in stock. Most will have the straight hose, but it is often more difficult to find a store that will let you look through their pre-molded hoses. Also, you can buy silicone hose from many performance catalogs in various sizes and angles, though they are a bit pricey ($30 to $50 each). Try Pegasus Auto Racing.
You now have a more efficient intercooler. The additional length
of plumbing usually has very little, if any, effect on turbo lag.
Do not exceed 2 1/4" diameter hoses and pipes. Larger diameters will
only increase the volume of the system which will increase lag. There
would be little to no improvement otherwise. You may be able to use
2" pipe and hose, but it is not recommended for these long runs.
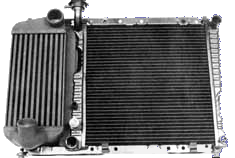
One common upgrade is to find an intercooler from a Dodge Conquest or Mitsubishi Starion at a salvage yard. These cars are not all that common anymore, so you may have to do some searching. You will find the intercooler behind the front facia, angled downward. It may also be helpful to take the brackets to aid your installation. Though the intercooler is somewhat larger and is freer-flowing, the does have small diameter hose connections (about 1 7/8"). You can either make an adaptor with a 2 1/4" to 1 7/8" exhaust pipe coupling, or you can remove the connections entirely and install your own 2 1/4" connections. Since the intercooler is aluminum, you will probably want a machine shop to do this for you since welding aluminum is very difficult and requires special equpiment. If you are lazy like me, you can cut out the old connections with a hack saw, widen the holes, mount a steel pipe in there with some screws and seal it up with RTV, JB Weld, epoxy putty, or whatever. It's not pretty or durable, but it does work.
Another popular intercooler is a new one from Spearco. Though they are expensive, they come is just about any size or form you could want and they are efficient, well made aluminum designs. For these, you have the opportunity to install the largest intercooler you can fit.
See Gary Donovan's Intercooler
Indentification Page for some pictures of intercoolers.
The procedure used to install an intercooler depends entirely on what
type of Turbo I engine you have. Intercooling a 1988 or later turbo
I engine can be rather simple, while intercooling an 1987 or earlier Turbo
I engine is significantly more complicated. This is because of the
intake arrangement change that was made in 1988 from the pull-through setup
to the blow-through setup. See the Turbocharger
Concepts page for more details. Basically, the blow-through setup
was just a non-intercooled Turbo II engine with a smaller turbo.
The pull-through setup was a completely different design. I have
broken down the information based on the intake setup:
If you decide to go with another intercooler, or wish to install the stock Turbo II intercooler behind the front facia, then you will have to follow the procdure outlined in the Relocating Your Intercooler section.
To achieve the higher boost levels of the Turbo II using stock boost
control (no bleeds, etc.), you will need to install the Turbo II ECU that
is compatable with your year. The 1986 and 1987 logic modules are
compatible with each other. The 1988 and 1989 SMECs are also compatible
with each other. I don't know about later years. If you install
the Turbo II SMEC on a 1988 or later engine, then you will have to install
your own
air charge temperature sensor,
since these Turbo I engines did not have one. You can drill and tap
a hole in your intake manifold or you can install it into the upper radiator
hose somehow. Either way, you will have to run wires to the appropriate
pins on the SMEC. It is easiest to remove the sensor and harness
from another engine equppied with one.
The least complicated way to do this is to install the Turbo II or blow-through Turbo I intake manifold and throttle body on the engine. If you do this, you will also have to either replace the exhaust manifold and turbo with Turbo II or blow-through Turbo I units, or you will need to do some grinding on the exhaust and intake manifolds so that they clear each other. It really isn't that difficult of you have a grinder.
Here is a link to a web page that details this:
You can control your sprayer manually with a switch on your dash, or you can rig it to a pressure switch that is connected to your intake manifold. When boost reaches a certain pressure, the pump will turn on. Or, you can do a combo of the two so that it automatically turns on only when you really want it to.
While this idea is not all that practical for the daily driver (unless
you are a serious street racer), it works great for drag racing if your
track will allow it. Some tracks won't let you spray anything while
going down the track, but if you have your sprayer setup right, all the
water should evaporate and they would never notice.
| Return to the Mini-Mopar Turbo Performance page |
This page is maintained by Russell W. Knize and was last updated 01/21/99. Comments? Questions? Email minimopar@myrealbox.com.
Copyright © 1996-2003 Russ W. Knize