Controlling Cold Start Injectors With A Pressure Switch
Description
This page describes how to control your cold start injector with a pressure
switch. Cold start injectors can most easily be found at salvage
yards on European vehicles that have mechanical fuel injection with the
Bosch fuel control system. These include Saab, Volvo, and Volks Wagon.
There are two sizes that are out there, but there seems to be no easy way
to identify them. They are usually located in the center of the intake
manifold; and on mechanically injected vehicles, they are the only injectors
with wires coming out of them. When removing them, cut the fuel line
about 2 inches or more from the injector because you will need it.
Also cut off the wire harness with the connector on it, so that you can
use it to make the electrical connection. Remove a couple different
ones to try out.
According to Gus, the easiest way to identify them is to apply 12V across
the pins and blow through them. Assuming you found at least one of
a different type, you'll find that some are easier to blow through than
others. According to Gus, the injectors that flow better are good
for 4psi of additional boost (or 30 HP), while the more restrictive ones
are good for about 2psi of additonal boost (or 15 HP).
Parts
These are most of the parts you will need to install a pressure switch-controlled
cold start fuel injector. It will vary, depending on how you do your
installation.
-
(1) cold start injector - purchase at a salvage yard, taken from a Saab,
Volvo, VW, etc.
-
(1) pressure switch - Hobbs part # 76052, or NAPA part # 7011577
-
a few feet of 3/16" I.D. fuel injection hose - depends on application
-
1/2 inch of 5/16" I.D. fuel hose
-
a brass 5/16" x 3/16" x 5/16" I.D. hose barb T-fitting - needs to be assembled
with pipe T and pipe-hose adapters
-
(2) hose clamps for 5/16" fuel injection hose - you may wish to double
these up
-
(2) hose clamps for 3/16" fuel injection hose - you may wish to double
these up
-
a few inches of 5/32 I.D. vacuum hose - depends on application
-
a plastic 5/32" I.D. hose barb T-fitting
-
some 18 guage or larger wire - depends on application
-
(2) #8 or #10, 3/4" sheet metal screws
Installation
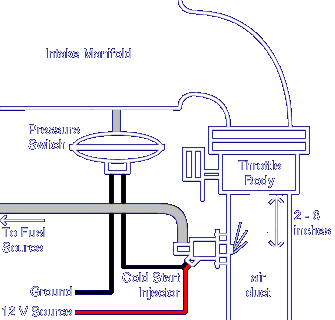
Using a pressure switch for this is quite simple. The easiest place
to install the injector is in the air duct near the throttle body.
If you have an intercooler, it has to be installed between the intercooler
and the throttle body because the intercooler would cause the fuel to condensate.
About 2 - 6 inches from the throttle body is a good place. The reason
for this is that the turbulence generated by the throttle body ensures
that the atomized fuel mixes evenly with the air. The actual position
around the duct that you need to mount the injector will depend on where
you have room. You will have to install it at an angle that will
clear the valve cover, hood, etc.
The fuel supply needs to be tapped off of the line to the fuel rail.
This is a 5/16" I.D. hose for our engines. The vacuum line to the
pressure switch needs to come from the manifold somewhere. Do not
use a line that is bled, such as the wastgate or canister purge lines.
Your configuration will then be something like this:

To calibrate this setup, you need to set the pressure switch so that
it turns on at the point where
your mixture tends to lean out. If
you are using a zener diode or pop-off valve on the MAp sensor, you should
set it just above the point where the MAP sensor stops responding.
For further details on this installation, see Gus Mahon's web page,
which includes a pictures of the installed injector:
Adding Fuel,
by Gus Mahon (skip to the 5th section)
Installing Two Or More Injectors
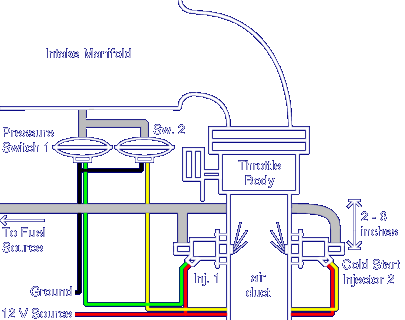
To install more than one injector using a pressure switch, the procedure
is the same. You need all the parts you needed for the first one
and should follow the same procdure. The exception would be the T-fittings
because you can tap right into the lines that you made for the first injector
and pressure switch. A two injector setup would be configured like
this:

Rather than use multiple pressure switches, you could use an Electronic
Engine Performance Controller (EEPC) control up to four injectors.
For more information about install the EEPC, see the Controlling
Cold Start Fuel Injectors With The EEPC page.
This page is maintained by Russell W. Knize and was last updated 04/22/99.
Comments? Questions? Email
minimopar@myrealbox.com.
Copyright © 1996-2003 Russ W. Knize


