Electronic Engine Performance Controller
TPS-Based WCV Controller With Quick Pressure Release
This circuit is one of several designs based on the Electronic
Engine Performance Controller concept. It is important to read
the Basic Design page first, or you will
probably have trouble understanding some of the terms I am using.
Be sure to read the entire contents of these pages.
Description
This circuit is a three or four stage wastegate control valve (WCV) controller
with quick pressure release, although not all three bleed controllers have
to be implemented. Four solenoids are required if all four stages
are to be implemented (3 for the boost stages and 1 for the quick pressure
release). The quick pressure release feature eliminates the need
for a small bleed on the pop-off valve, which causes the wastegate to close
immediately.
This design uses all four comparators in the LM339. Three of them
are configured as positive response circuits, which are used as the TPS
stages. The forth is a negative response circuit, which is used for
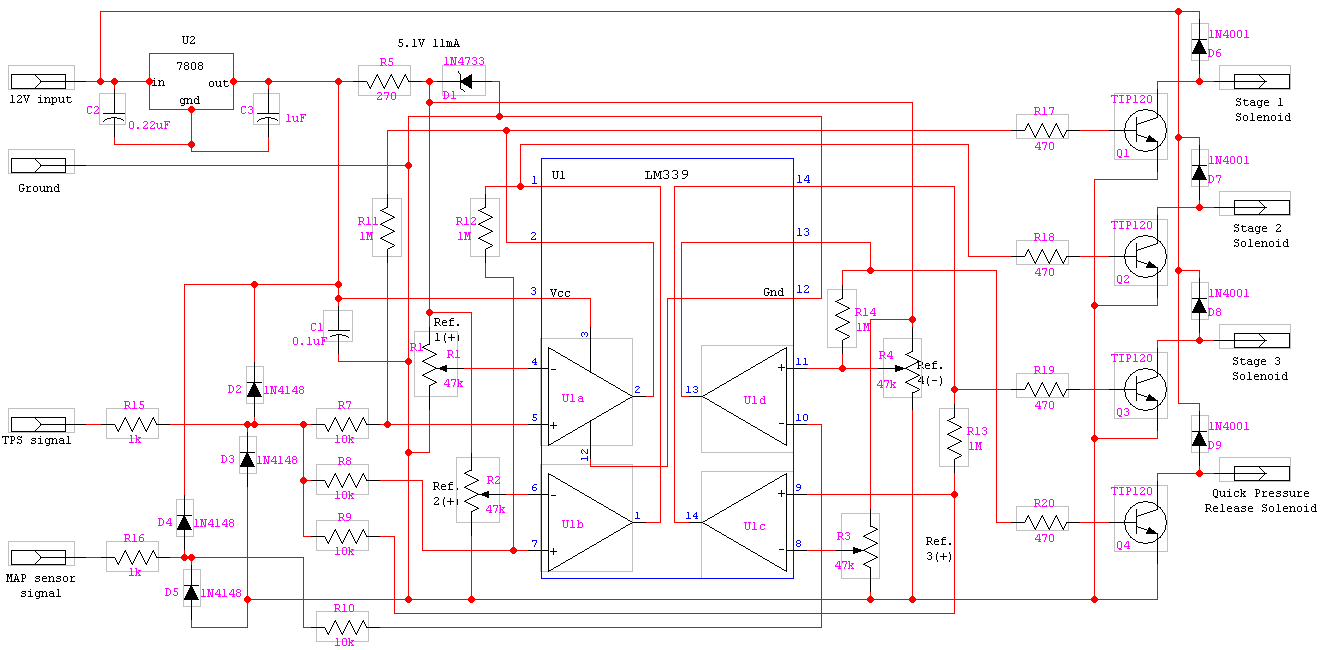
the quick pressure release solenoid. Here is what the schematic looks
like:
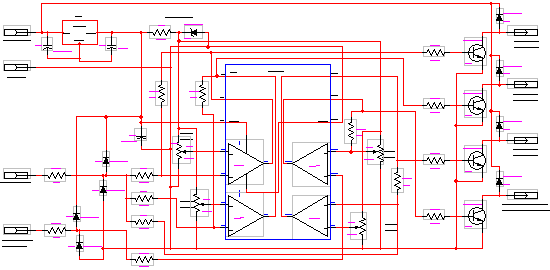
(click here for the full image)
Theory Of Operation
The way the comparators work has already been discussed, but here I will
explain why the various compnents are there:
R1 - R4: These are the reference voltage adjustments.
R5, D1: These provide the 5.1V reference voltage. A 270
ohm R5 provides about 11mA of current, which is more than enough for 4
comparator references. If your circuit has many more comparators
or uses different pots (R1-R4), you may need to drop the value of R5 to
increase the supply current, but each comparator and reference (if 47k
pots are used) only requires about 0.4mA of current.
R7 - R10: These are in place to limit the input current to the
comparator so that some feedback can be provided for hysteresis
R11 - R14: These are the feedback resistors that provide hysteresis
to each comparator to prevent oscillation when the input voltage is very
close to the reference voltage. With R7-R10 set to 10k and R11-R14
set to 1M, the total hysteresis is about 81.2mV (0.0812V), which is small
enough to still provide very good response. If your input signal
is noisey and the comparator oscillates, you can decrease value of the
feedback resistor to increase the hysteresis voltage.
R15 - R16: These are used in conjunction with D2-D5 as input
signal protection.
R17 - R20: These are used to limit the base current of the driver
transistors. If you are using a different transistor other than TIP120,
then you may need to adjust the values of these.
C1: This is a filter capacitor that is used to keep the
LM339 chip from oscillating due to noise on the power supply. Each
LM339 chip has to have its own filter capacitor and it should be put very
close to the Vcc pin (pin 3).
C2, C3: These are used to assist the 7808 regulator is maintaining
a very stable output voltage. C2 suppresses high frequency noise
while C3 acts as a reserve current source for improved regulator transient
response.
D2 - D5: These are used in conjunction with R15-R16 to prevent
the input signal voltage from going below ground or above Vcc.
D6 - D9: These are used to suppress the lash-back current from
the solenoids.
Q1 - Q4: These are the driver transistors for the solenoids.
They are NPN-type and are setup in an open-collector configuration.
When a comparator turns a solenoid on, the output (collector) of the transistor
provides ground to the solenoid.
U1a - U1d: These are the comparators within the LM339 chip.
U2: This is the 8V regulator, a 7808 is recommended. For
power supply alternatives, see the EEPC: Basic
Design page.
Parts
You will need to decide what kind of project cases, wire, and connectors
to use, depending on which setup you choose. I have designed these
circuits so that the part can be purchased at your local Radio Shack, but
I recommend purchasing them through another dealer, such as Mouser or Digikey
for better prices. Use the industry part numbers or descriptions
when ordering from one of these other suppliers. The Radio Shack
catalog part numbers have also been provided, if you choose to go that
route. Keep in mind the Radio Shack tends to package their parts
in fixed quantities, so you will end up with extra parts. The number
of packages you need depends on the quanity inside, so keep track of this.
Also, if you modified the design at all, this list will not be correct
(obviously).
| Ref # |
Industry Part # or Desc. |
Radio Shack |
| R1-R4 |
47k ohm trim pot |
271-283 |
| R5 |
270 ohm, 1/4 watt, 5% resistor |
271-1314 |
| R7-R10 |
10k ohm, 1/4 watt, 5% resistor |
271-1335 |
| R11-R14 |
1M ohm, 1/4 watt, 5% resistor |
271-1356 |
| R15-R16 |
1k ohm, 1/4 watt, 5% resistor |
271-1321 |
| R17-R20 |
470 ohm, 1.4 watt, 5% resistor |
271-1317 |
| C1 |
0.1uF, 50V, monolithic capacitor |
272-1069 |
| C2 |
0.22uF, 50V, monolithic capacitor |
272-1070 |
| C3 |
1uF, 35V, tantalum capacitor |
272-1434 |
| D1 |
1N4733 - 5.1V, 1 watt zener diode |
276-565 |
| D2-D5 |
1N4148 - 75PIV, switching diode |
276-1122 |
| D6-D9 |
1N4001 - 50PIV, 1A (30A surge) diode |
276-1101 |
| Q1-Q4 |
TIP120 - med-power NPN transistor |
276-2068 |
| U1 |
LM339 - quad comparator |
276-1712 |
| for U1 |
DIP-14 IC socket, dual wipe, 0.300 spacing |
276-1999 |
| U2 |
7808 - +8VDC fixed voltage regulator |
RSU 11468972 |
Testing
Before calibrating the circuit, you should test out the power supplies,
inputs, and outputs. This is only possible if you installed a socket
for the LM339 chip (U1).
-
With the LM339 chip removed from the socket, connect the circuit 12V and
ground connections to a 12VDC power source.
-
Using a voltmeter, test the output of your 8V regulator. If you used
a 7808, it should be very close to 8.0V. If you used the zener method,
it should be close to 8.2V.
-
Test the output of your 5V reference voltage. It should be close
to 5.1V.
-
Put the positive lead of your voltmeter to pin 3 of the socket and the
negative lead to pin 12 of the socket. You should measure 8V.
-
Test the reference outputs by measuring the voltage at pins 4, 6, 8, and
10 of the U1 socket. You should be able to vary them between about
0V to about 5V by turning their respective trim pots.
-
Test the inputs by putting a 0 - 8 test voltage on each input connection.
When the test voltage is on the TPS input, you should be able to detect
it at pins 5, 7, and 9 of the U1 socket. When it is on the MAP sensor
input, you should be able to detect it at pin 11 of the U1 socket.
-
Connect a 12V test device on one of the circuit outputs. A relay,
solenoid, or low-current 12V lamp will work. Connect 12V to one side
of the device and the output of the circuit to the other side.
-
Test the output transistor by applying 8VDC to the respective output pin
(2, 1, 14, or 15). The test device should activate.
If your circuit has passed all of these tests, then it is probably functioning
properly. Disconnect the power to the circuit and install the LM339
chip in the socket (if you have one). Follow this procedure to test
out the entire circuit:
-
Connect the circuit 12V and ground connections to a 12VDC power source.
-
Apply about a 2.5V test voltage to the TPS signal input connection.
-
Connect your output test device (a relay, solenoid, or low-current 12V
lamp will work) to output 1 of the circuit.
-
Adjust the corresponding trim pot (R1, in this case) to change the reference
voltage for that comparator. When the reference voltage id above
the input test voltage, the output should be off. When it is below
the test voltage, the output should be on.
-
Repeat steps 3 and 4 for each of the four outputs, remembering that you
have to put the test voltage on the MAP sensor input for the 4th one.
If your circuit passed this test, then it is ready to calibrate!
Calibration
You now need to set the reference voltages to the desired values.
See the Multi-Stage Wastegate Control Valve
Using The EEPC page for details on how to do this.
This page is maintained by
Russell
W. Knize and was last updated 04/20/99. Comments? Questions? Email
minimopar@myrealbox.com.
Copyright © 1996-2003 Russ W. Knize