This page is devoted to a simple electronic circuit that is used
as a boost response controller for Chrysler's turbocharged engines of the
late 80s and early 90s. It functions by holding the wastgate solenoid
open thereby closing the wastegate until the MAP sensor voltage (boost
pressure) reaches a specified threshold. Control of the wastgate
solenoid is then returned to the logic module. This functions similarly
to LRE's turbo response kit except that it is electronic and can be adjusted
or disabled while driving. Also, it costs only about $20-$30 in parts
as opposed to the $140 LRE unit.
Be sure to read the entire contents
of these pages.
The circuit is a simple comparator that holds the solenoid on until
the boost pressure reaches the threshold. Control is returned to
the logic module until the boost pressure drops below a lower threshold.
The circuit is fairly simple and stout using standard parts available at
your local Radio Shack and hardware store.
On a stock Turbo I engine, 0-9 psi is considered "normal" boost while 10-12 psi for a limited interval is considered peak boost. Even though this circuit is designed only to improve boost response, it is possible to set the threshold above the peak boost level of your engine and achieve higher levels of boost. On my 88 Shadow ES, I am able to set the threshold to it's maximum and not exceed 12 psi of boost. This is due to the restriction of the vacuum lines between the wastegate actuator and the solenoid. To the computer in this condition, the turbocharger seems like it is spinning out of control and the computer is trying to control it with the wastegate solenoid. This causes the wastegate duty cycle values contained in the lookup tables of the logic module's (or SMEC's) memory to be decreased to almost nothing. As a result, when the circuit is disabled, the wastegate is "overcontrolled" and the turbo will only achieve about 5 or 6 psi of boost. Over time, the tables will correct themselves and normal boost will return. This can also be remedeed by resetting the computer, which returns the table values to their defaults. Of course, none of this will happen if you don't exceed 9 psi and allow the circuit to return control of the wastegate back to the computer, or if you never disable the circuit.
This circuit can be implemented in two ways. If you prefer to install all the components into one box, or you have already wired your car for the original version of this circuit, then you can use the full schematic diagram and build it as one module. If you would like to save yourself some wire (in the car), you can implement the circuit as two modules using the two-part schematic diagram.
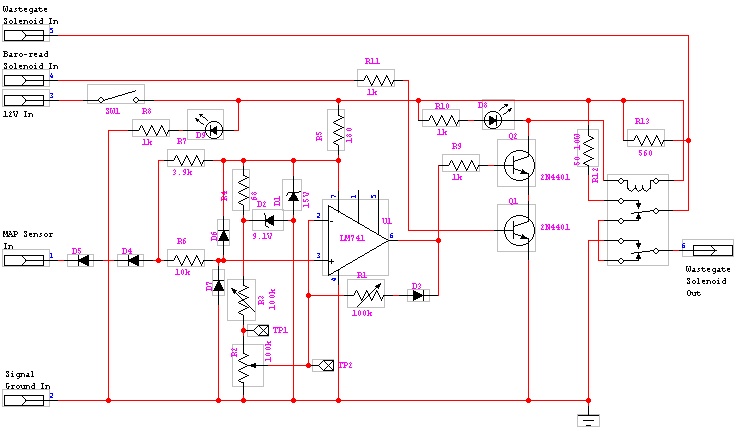
Below is the single module schematic for the full circuit. There
is also a high resolution version of
the schematic available that is easier to read and more suitable for printing.
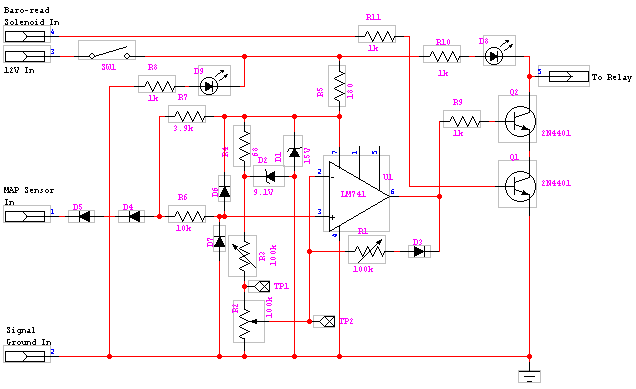
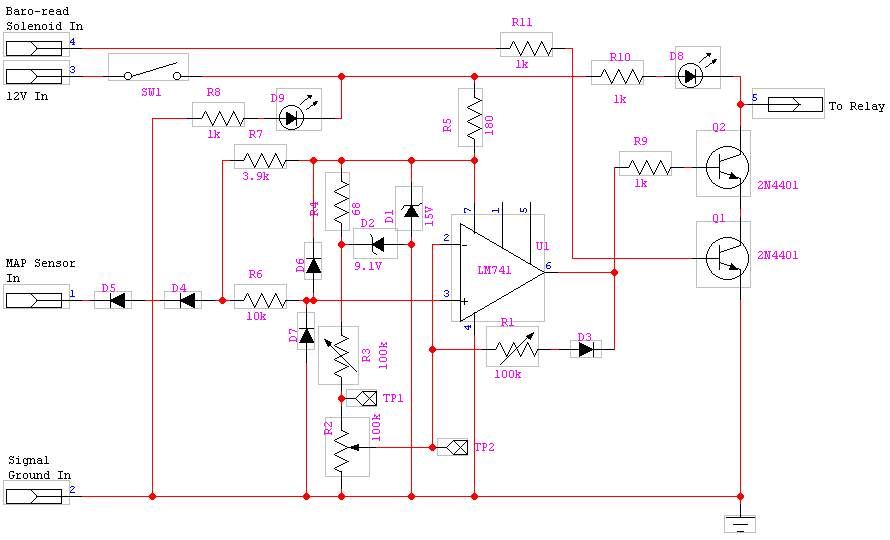
Below is the dual module schematic for the circuit. There are
also high resolution versions of the control
circuit and relay circuit schematics
available that are easier to read and more suitable for printing.

Relay Circuit
|
|
|
You will also need a 12V-14V power supply to power the circuit, a 0V-5V variable voltage source to simulate the MAP sensor (use a simple voltage divider with a potentiometer if you don't have one), and a decent volt meter for calibration and bench testing.
The circuit uses a relay to switch the solenoid between logic module
control and full on. When the circuit has control of the solenoid,
the logic module's output is connected across R12. The resistor behaves
(electrically) like the solenoid, and thus a fault
code 36 is not stored by the logic module. The 15V zener diode
(D1) as well as the clamping diodes on the input (D6, D7) protect the op
amp from harmful voltage spkies that are produces by the alternator. The
input offset diodes (D4, D5) with a pull-up resistor (R7) raise the MAP
sensor voltage range from 0-5 volts to 1.2-6.2 volts to ensure latch reset.
Below is the calibration procedure for the above circuit.
| 1) | Turn S1 to the off position, connect P2 to the negative output on the power supply, connect P3 and P4 to the positive output on the power supply, and connect P1 to the 0V-5V variable voltage source. |
| 2) | Set the variable voltage source to 5V (or to the maximum output of your MAP sensor if it is not stock) and measure the voltage on pin 2 (negative input) on the op amp. Record this voltage; it should be around 6.2V for a stock MAP sensor. |
| 3) | Connect some sort of indicator to the output by connecting the negative end of the indicator to P6 and the positive end to the positive output of the power supply. A 12V light bulb works well. |
| 4) | Rotate R2 to the highest setting (furthest from the grounded pin) and R1 to its highest resistance setting. Adjust R3 until the indicator comes on if it isn't already. Measure the voltage at test point 1 (between R2 and R3). Then adjust R3 until the voltage at test point 1 approaches the voltage measured in step 2. Carefully continue to adjust R3 in the same direction until the indicator goes off. |
| 5) | R1 adjusts the reset point of the circuit. This determines how far the MAP sensor voltage (manifold pressure) must drop before the circuit takes control of the wastegate again. Vary the adjustable voltage source and watch the output indicator of the circuit. A decrease in the resistance of R1 will require a lower MAP sensor voltage for a reset. This reset point changes somewhat with a change in the value of R2 so experiment with different R2 and R1 settings (if you intend to make R2 adjustable on-the-fly). Leaving R1 at its maximum resistance will cause the reset to be almost immidiate. Some resistance is required here! If you leave this feedback line open, the circuit will oscillate and have unpredictable behavior. |
| 6) | Repeating steps 4 (without changing R1) and 5 will ensure a complete calibration. "Play" with the circuit a little by simulating a varying MAP sensor voltage with the adjustable voltage source and various R2 values to make sure the circuit is functioning properly. |
| MAP Sensor (20 gauge): Use a simple, plastic in-line wire tap (available at hardware stores or Radio Shack cat# 64-3053) to tap pin 1 into the center wire coming from the sensor. |
| Baro-read Solenoid (20 gauge): Using another wire tap, connect pin 4 to the baro-read solenoid wire that leads to the power module (or SMEC). On 87 and later vehicles, this solenoid is located on the same bracket that the MAP sensor is mounted. If you do not have the wiring diagrams for your car, the correct wire should be the smaller of the two. The incorrect wire of the two would be the one that leads to the common J2 splice. All the solenoids are tied into this splice and it serves as the common supply to all of them. The J2 splice is a dark blue, 14 gauge wire on my 88 Shadow. The correct wire to use for all solenoids will be the other wire (the one not leading to the J2 splice). |
| Wastegate Solenoid (16 gauge): Find your wastegate solenoid. It can be most easily identified by following the vaccum line from the wastgate. The other solenoid is for the purge canister and its vaccum line leads towards the front of the car rather than the engine. On my 88 Shadow, there is a large, 4 pin plug that leads to the wastgate/purge canister solenoid set. By disconnecting this plug and the two plugs to each solenoid, it becomes much easier to work on the harness. Find the wire that leads from the wastegate solenoid to the logic module (or SMEC). It can be identified the same way as the baro-read solenoid. Cut this wire about mid-way between the two connectors. Strip the ends of the wire and use crimp connectors on each. I used "bullet" connectors because they are easy to use and are insulated. These can be found at any hardware store or from Radio Shack (cat# 64-3047). Use one male and one female so that you can reconnect them if you wish to return your system to normal. Strip the wires leading to pins 5 and 6 and attach the appropriate bullet connectors to them. Pin 5 should connect to the wire from the power module (or SMEC) and pin 6 should connect to the wire leading to the solenoid. |
| All that is required now is to connect pin 2 to ground and pin 3 to your 12V power supply. This can be connected to the accessory line, or to the J2 splice. If you have your wiring diagrams, you'll see that the J2 splice leads to the ignition switch through the engine connector below the dash. It is usually a dark blue wire. This would be the ideal line to tap for power since the computer uses the same line to power the solenoids. |
| Return to the Electronic Boost Response Controller page |
This page is maintained by Russell W. Knize and was last updated 10/08/98. Comments? Questions? Email minimopar@myrealbox.com.
Copyright © 1996-2003 Russ W. Knize