Electronic Boost Response Controller Conversion
Convert the original version EBRC to include the new features in the EBRC
II
This page will discuss how to use the older version of the Electronic
Boost Response Controller (EBRC) to include the new features of the EBRC
II. For reference, the old schematics for the orinignal version are
available at the end of this page.
Description
The old circuit design is still a good one. In fact, little has changed
in the control circuit itself. All that is required is that you build-up
the remote relay portion of the dual-module EBRC II. Here is the
schematic and parts list for the remote circuit:

Remote Relay Circuit
| R12 |
50 ohm 10 watt |
271-133 |
| R13 |
560 ohm 1/2 watt |
271-1116 |
| RLY1 |
12V DPDT relay |
275-249 |
|
You can mount the remote relay circuit wherever you wish. You
can follow the guidelines on the EBRC II page, and mount it under the hood,
or you can mount it near the old control circuit. Whether you ran
all the wires for the old circuit or installed the diodes under the hood,
it is easy to integrate the old circuit with the new relay circuit.
The Conversion
You will need to remove the "Wastegate Solenoid In" wire from pin 5 of
the old circuit. This wire is connected to pin 4 of the relay circuit.
Similarly, the "Wastegate Solenoid Out" wire from pin 6 of the old circuit
needs to be removed and connected to pin 5 of the relay circuit.
Now, you just have to connect the two circuits by running a wire from pin
6 of the old circuit to pin 1 of the relay circuit. If you choose
to mount the relay circuit near the old control circuit, you simply move
the appropriate wires and run a short wire between the two (pin 6 to pin
1, as above). If you mounted your diodes under the hood, just replace
the diode circuit with the relay circuit. Finally, connect the relay
circuit to ground and 12V.
Original Circuit Schematics
Here is the schematic and parts list to the old design. The high
resolution version is also still available for detailed viewing and
printing. These images work now, I promise!
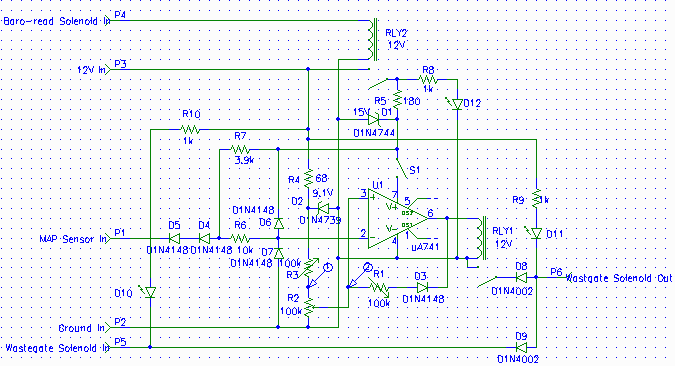
Old Control Circuit

Old Remote Diode Circuit
| D1 |
1N4744 |
276-564 |
| D2 |
1N4739 |
276-562 |
| D3 |
1N4148 |
276-1620 |
| D4 |
1N4148 |
276-1620 |
| D5 |
1N4148 |
276-1620 |
| D6 |
1N4148 |
276-1620 |
| D7 |
1N4148 |
276-1620 |
| D8 |
1N4002 |
276-1653 |
| D9 |
1N4002 |
276-1653 |
| D10 |
Computer control LED |
276-1622
276-1655
or others |
| D11 |
Circuit output status LED |
| D12 |
Circuit ready LED |
|
| R1 |
100k ohm var |
271-284 |
| R2 |
100k ohm pot |
271-092 |
| R3 |
100k ohm var |
271-284 |
| R4 |
68 ohm 1/2 watt |
271-1106 |
| R5 |
150 ohm 1/4 watt |
271-1312 |
| R6 |
10k ohm 1/4 watt |
271-1335 |
| R7 |
4.7k ohm 1/4 watt |
271-1330 |
| R8 |
1k ohm 1/4 watt |
271-1321 |
| R9 |
1k ohm 1/4 watt |
271-1321 |
| R10 |
1k ohm 1/4 watt |
271-1321 |
|
| U1 |
741 general-purpose op amp |
276-007 |
| RLY1 |
12V SPST reed relay |
275-233 |
| RLY2 |
12V SPST reed relay |
276-233 |
| S1 |
SPST switch (any) |
275-series |
|
This page is maintained by
Russell
W. Knize and was last updated 10/09/98. Comments? Questions? Email
minimopar@myrealbox.com.
Copyright © 1996-2003 Russ W. Knize