Engine Timing And Belt Replacement
[ Belt Removal | Belt Installation/Timing | Base Ignition Timing ]
Description
This page details how to replace your engine timing belt and time the engine. If you have already removed the belt and are ready to time the engine with the new belt, skip down to the Installing The Timing Belt section. Otherwise, use the procedure below to remove the belt.
Removing The Timing Belt
- Remove the drive belts from the crankshaft pulley. These include the power steering, alternator/water pump, and A/C compressor belts, where applicable. See the Drive Belt Replacement page for more information.
- Remove the two nuts on the valve cover studs and the 10mm bolts beneath the engine mount to remove the upper belt cover. It will likely hang up on the A/C compressor bracket. You can slide a flat-head screw driver or a putty knife between the cover and the bracket and pry it slightly to unhook it.
- Jack up the right side of the vehicle and put it on a jack stand. Remove the right wheel and the plastic wheel well shroud at the back of the well. Using a #? Torx socket (not a screw bit), remove the four or five bolts holding the main crankshaft pulley on. Do not remove the center bolt.
- Remove the two remaining 10mm bolts holding the lower belt cover and remove the cover.
- Place a jack under this side of the engine and raise the engine slightly to take the weight off of the right side engine mount. Remove the nut and bolt through the center of the mount and the large nut that is directly under it. Remove the two bolts where the mount is attached to the frame and remove the outer half of the mount. Try not to let the engine shift in any direction with the mount removed from this point on.
- Loosen the bolt on the timing belt idler pulley and rotate the pulley bearing 180 degrees using a large wrench to remove the belt tension as much as possible. Holding the pulley in this position, snug up the bolt again.
- Slide the belt off of each of the sprockets a little at a time. If you cannot get the belt off this way, remove the camshaft sprocket by removing the bolt at the center and sliding it off the shaft.
If you had trouble with your timing belt squeaking, or if you came from that page, go to the Fixing Noisy Belts page now.
Installing The Timing Belt
- Replace all timing sprockets if any were removed. Be sure not to mix up the camshaft and intermediate shaft sprockets. Though the sprockets themselves are the same, they go on in opposite directions and not all sprockets have markings on both sides. The camshaft sprocket has the offset such that the belt is the furthest away from the engine. The intermediate shaft has the belt offset closer to the engine. If the camshaft sprocket was removed, place it back on the shaft, but do not install the bolt yet (this makes belt installation much easier).
- When rotating the sprockets to line them up, always rotate them clockwise. Never reverse-rotate the engine.
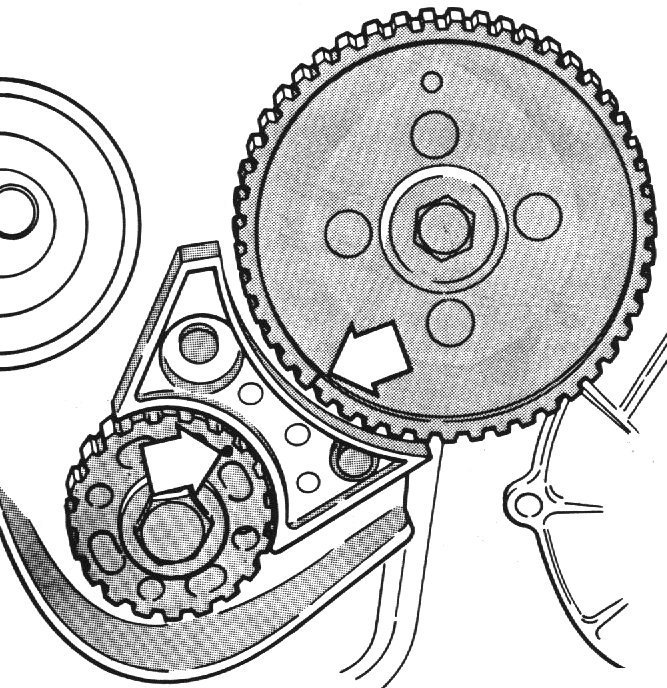
- Use a 15mm ratchet or wrench on the center bolt to rotate the crankshaft such that the mark on the sprocket is pointing directly towards the center of the intermediate shaft (see diagram below). This is to achieve TDC. Look through the ignition timing window on the top of the transmission bell housing. Move the crankshaft so that the timing mark on the flywheel lines up with the 0 degrees mark on the window (usually the left-most mark). You are now at perfect TDC.
- Rotate the intermediate shaft such that the mark on the sprocket lines up with the mark on the crankshaft sprocket (see the diagram). If you remove the distributor cap, you should see the rotor pointing at the #1 cylinder spark plug wire. If it is pointing the opposite direction, you may have installed the distributor shaft 180 degrees off when you installed distributor base housing. If so, remove the distributor hold down bracket, pull the base, rotate the shaft 180 degrees, and reinstall.
(click here for a larger image)
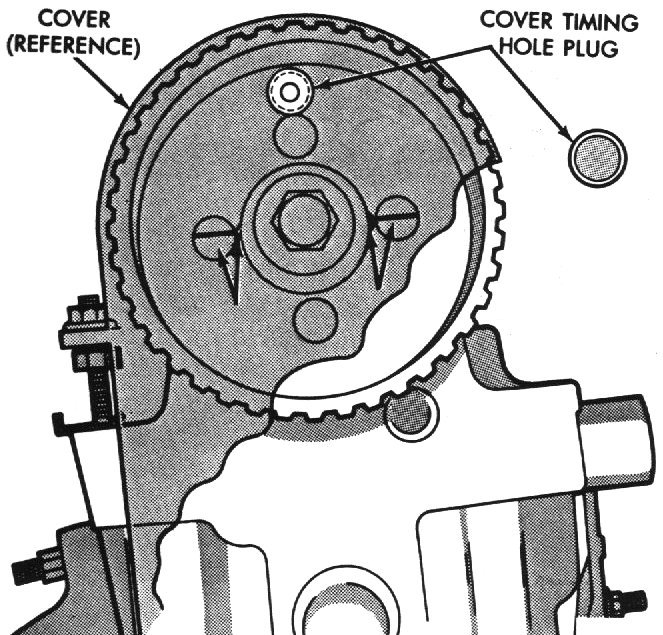
- Rotate the camshaft sprocket such that the smaller hole in the sprocket is pointing up. Remember that the engine is leaning back slightly in the engine bay. "Up" is relative to the engine head. You can temporarily replace the upper belt cover and pull the plug out of the hole at the top. You should be able to see the small hole in the sprocket centered in the hole on the cover. When the hole is in the upper-most position, you will be able to see the seam between the head and the camshaft bearing cap through the two side-most holes on the sprocket. Use a mirror to help. The seam should be at the center of the holes. See the diagram:

(click here for a larger image)
- Make sure that the belt idler pulley is angled to allow the easiest belt replacement. Carefully slide the belt onto each sprocket, making sure they do not rotate. With the belt started, double check the timing of each sprocket.
- Slide the belt the rest of the way onto the sprockets. If you cannot get the belt all the way on, carefully slide the camshaft sprocket back off the shaft and slide the belt completely onto all the sprockets. It helps to have two people here so that one person can hold the belt on the lower sprockets. With the belt on all the sprockets and positioned properly at the idler pulley, slide the camshaft sprocket back on.
- Re-verify that the timing is still correct.
- Rotate the idler pulley using a the tensioner tool or a large wrench, such that the tool/wrench is horizontal to the engine and loosen the bolt. The tool (Chrysler #C-4703) is available through the "MotorMite" brand at various auto parts stores. If you removed the pulley or the pulley moved, rotate it such that it has the least tension on the belt and start from there. Rotate the tool/wrench until it is horizontal to the engine (see diagram). Allow the tool's own weight to determine the belt's tension.
(click here for a larger image)
- With the tool still in place, use the 15mm ratchet or wrench on the crankshaft to rotate it clockwise two, full revolutions. Try to be as smooth as possible. Observe the tool's maximum downward (counter-clockwise) movement while you are rotating the crankshaft. This is maximum tension. Hold the tool in that position when tightening the idler pulley.
- Tighten the idler pulley bolt to 45 ft-lbs (68 N-m). If you removed the camshaft or intermediate shaft sprockets, tighten them to 65 ft-lbs (88 N-m). Be sure NOT to let the sprockets rotate when tightening them, or the belt may jump time or get damaged.
- Rotate the crankshaft clockwise 2 full revolutions and verify that all the timing marks properly line up.
- Reattach the outer half of the engine mount to the inner half. Slide the center bolt though and screw the nut on hand tight. Install the large lower nut and tighten it to 75 ft-lbs (102 N-m). Tighten the center bolt and nut to 75 ft-lbs (102 N-m) also. Bolt the mount back to the vehicle frame and tighten the bolts to 21 ft-lbs (28 N-m). Remove the jack from under the engine.
- Reinstall the lower timing belt cover and tighten the bolts to 40 in-lbs (4 N-m). Install the crankshaft pulley and torque the Torx bolts to 250 in-lbs (N-m). Replace the wheel well shroud and the wheel back to the hub and lower the vehicle.
- Reinstall the upper timing belt cover and torque the bolt and nuts to 40 in-lbs (4 N-m).
- Replace the drive belts using the procedure on the Drive Belt Replacement page.
Setting The Base Ignition Timing
- Set the gearshift selector to "Park" for an automatic transmission or to neutral and apply the parking brake for a manual transmission. Turn all accessories (lights, radio, etc.) off.
- If you have a magnetic timing tool, insert the probe into the hole next to the timing window on the transmission bell housing. If you have a "timing light", connect the light's probe to the #1 cylinder spark plug wire. You may need to remove the air box to get a clear view of the window. If so, plug all open vacuum lines.
- Start the engine and allow it to reach operating temperature (idle for 5 to 10 minutes in 70 degree temperatures).
- With the engine running, disconnect the coolant temperature sensor wire. This forces the computer to stop controlling spark advance and set it to whatever the base is. The sensor is located on the left side of the water box (where the thermostat housing mounts). If the engine stumbles, open the throttle slightly until the engine idle stabilizes.
- Read the timing tool or point the timing light at the window and pull the trigger. If using a timing light, you should see the timing mark on the fly wheel line up to the desired degree mark. The proper stock base timing is specified on the VECI label, which is usually located on the under-side of the hood. 12 degrees advanced is typical for a turbo engine. If the timing is correct, shut the engine off, reconnect the coolant temperature sensor wire, and reassemble anything that was taken apart. If the timing was incorrect, or you could not see the timing mark (make sure you are connected to cylinder #1 if using a timing light), then proceed to the next step.
- Loosen the bolt on the distributor hold down bracket so that the distributor can be rotated with some friction.
- Rotate the distributor slowly until the desired timing is reached. Rotating clockwise will retard the timing, while rotating counter-clockwise will advance the timing. If you could not see the timing mark, try advancing or retarding the timing until the mark appears in the window. If you cannot make the mark appear, you may not have lined up the intermediate shaft properly when installing the timing belt.
- Once the desired timing has been achieved, always allow the engine to settle back to normal idle and recheck the timing. Once the timing is set, tighten the distributor hold down bolt. Reconnect the coolant temperature sensor wire, shut the engine off, and reassemble anything that was taken apart.
Updated 11/05/2003.
Copyright © 1996-2003 Russ W. Knize.